iOS逆向(三)分析篇
在逆向环境、工具准备得七七八八后,就开始学习一下逆向的套路。先要定位一个逆向的目标App和需要Tweak它的功能点,然后通过网络分析、动态分析、静态分析、沙盒分析等方法,来看看一般是如何给一个App做逆向的,怎么找出题目的位置、有什么解法。知道题该怎么解后,接着是学习怎么造Tweak,怎么把别人App的功能扭曲成自己想要的效果。
需求分析
目标应用是一个关于协助起名字的App,通过提供指定的起名条件,例如双名还是单名,姓,出生年月,性别的信息,来获取(符合风水命理的)对应的名字组合。
结果中会有小吉名,大吉名,和大师推荐名的分类,其中大吉名和大师推荐名是要分别付款解锁才能查看的。

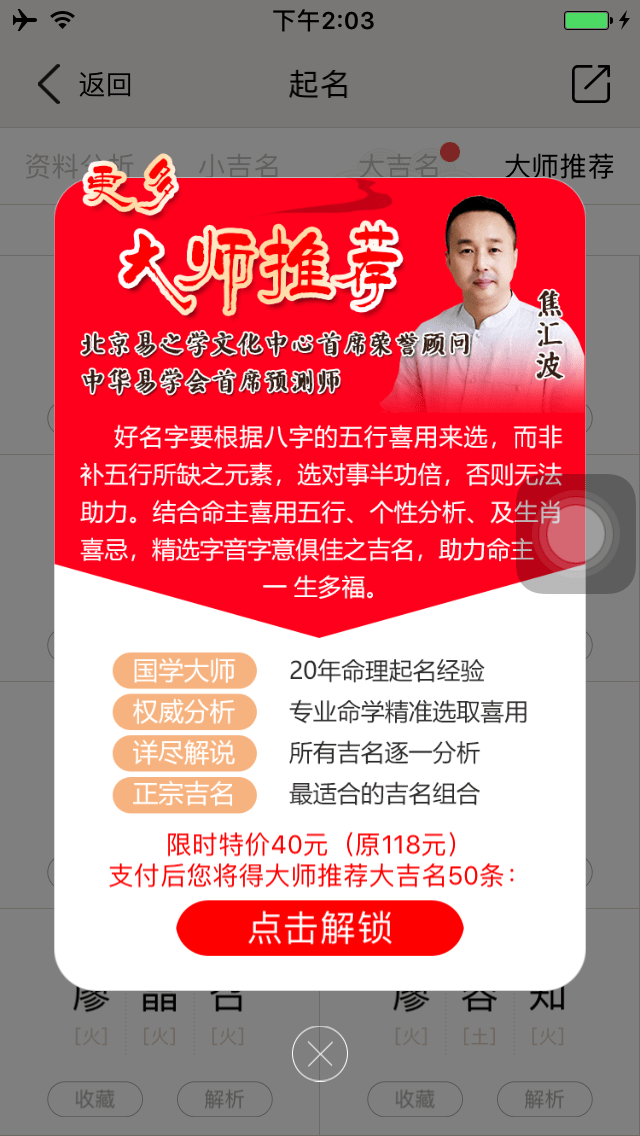
下面就针对这两个付款功能,尝试破解。
网络分析
无论是启动应用的初始化请求,还是起名分析请求(已经请求过的起名条件则不会重复发起网络请求),都会带有下面这些参数
appname	    naming_fugui_iphone
client      iPhone
device      iPhone
openudid    FD7925AB-92C0-438C-B6E1-C58339553B57
idfa	       332C7245-BCD7-458A-BB1F-BC25F6C2D541
sign        600D1E13A20AEADE3C5485E78418DC3E
ver 1.2- appname代表当前App名称,估计其作用为区分不同的马甲包;
- client和device估计是区分操作系统、操作终端、设备类型等;
- openudid估计用户的唯一标识;
- idfa则是熟知的广告ID;
- sign估计就是对部分参数值按一定顺序(如appname+client+device+openudid+secretkey),加入密钥key进行签名后的序列(因为尝试修改了它,或者以上参数后就无法获取数据了)
在初始化请求中返回的data主要是一些动态控制的设置内容,如广告、好评、定时本地推送、跑马灯、支付渠道等等。
其次,起名分析请求获得的结果如下,其中tjm字段对应推荐名板块、zxm字段对应小吉名板块、info字段对应资料分析板块,对应大吉名板块的数据并没有返回。然后还有一个叫product的字段,里面包含了三个类似品项的对象,其中一个值得注意的是product_identifier为test的对象,它的价格只需0.01,萌生第一个试想:购买大吉名时换成这个商品ID是否行得通。
{
	"code": "E00000000",
	"msg": "\u64cd\u4f5c\u6210\u529f\u3002",
	"data": {
		"tjm": [...],
		"zxm": [...],
		"info": {...},
		"product": {
			"jiMing": {
				"product_identifier": "zhangjingfuguiqiming001",
				"product_name": "...",
				"product_desc": "...",
				"product_price": 25
			},
			"tuiJian": {
				"product_identifier": "zhangjingfuguiqiming002",
				"product_name": "...",
				"product_desc": "...",
				"product_price": 40
			},
			"tianJiang": {
				"product_identifier": "test",
				"product_name": "...",
				"product_price": 0.01
			}
		}
	}
}
砸壳
先ssh到手机上
$ iproxy 4567 22
$ ssh -p 4567 root@127.0.0.1
先定位出其可执行文件所在的目录路径。在手机打开Target App,然后通过当前运行的进程查找
iPhone:~ root# ps -e | grep /ApplicationsPID TTY TIME CMD
1234 ?? 0:08.97 /var/containers/Bundle/Application/XXXXXXX-XXXX-XXXX-XXXX-XXXXXXXXXXXX/Target.app/Target
Appstore App可执行文件是在/var/containers/Bundle/Application/样式的路径里面,再通过对比其相关的.app文件名含义就不难找到正确的路径。
然后是定位Target App的Documents目录路径。
利用cycript进入Target App的进程后,使用cycript的语法获取当前沙盒目录中Documents的路径
iPhone:~ root# cycript -p targetAppPID
cy# [[NSFileManager defaultManager] URLsForDirectory:NSDocumentDirectory inDomains:NSUserDomainMask][0]最后就是将dumpdecrypted.dylib拷贝到Target App的Documents目录下(开启iproxy中)
$ rsync -avz -e "ssh -o StrictHostKeyChecking=no -o UserKnownHostsFile=/dev/null -p 4567" --progress /Path/to/dumpdecrypted.dylib root@127.0.0.1:/var/mobile/Containers/Data/Application/YYYYYYY-YYYY-YYYY-YYYY-YYYYYYYYYYYY/Documents/开始砸壳
iPhone:~ root# cd
iPhone:/path/to/Documents root# DYLD_INSERT_LIBRARIES=dumpdecrypted.dylib /var/containers/Bundle/Application/XXXXXXX-XXXX-XXXX-XXXX-XXXXXXXXXXXX/Target.app/Target
dyld: could not load inserted library ‘dumpdecrypted.dylib’ because no suitable image found. Did find:
dumpdecrypted.dylib: required code signature missing for ‘dumpdecrypted.dylib’
/private/var/mobile/Containers/Data/Application/YYYYYYY-YYYY-YYYY-YYYY-YYYYYYYYYYYY/Documents/dumpdecrypted.dylib: required code signature missing for ‘/private/var/mobile/Containers/Data/Application/YYYYYYY-YYYY-YYYY-YYYY-YYYYYYYYYYYY/Documents/dumpdecrypted.dylib’
Abort trap: 6
若报以上错误,可参考这里解决,思路就是使用MacOS上任何一个有效的证书对dumpdecrypted.dylib先做一个签名再拷贝到Target App的Documents
## 列出可签名证书
$ security find-identity -v -p codesigning
## 为dumpecrypted.dylib签名
$ codesign --force --verify --verbose --sign "iPhone Developer: xxx xxxx (xxxxxxxxxx)" dumpdecrypted.dylib
再次砸壳,就成功了
mach-o decryption dumper
DISCLAIMER: This tool is only meant for security research purposes, not for application crackers.
[+] detected 64bit ARM binary in memory.
[+] offset to cryptid found: @0x1000b0c08(from 0x1000b0000) = c08
[+] Found encrypted data at address 00004000 of length 3801088 bytes - type 1.
[+] Opening /private/var/containers/Bundle/Application/4E0F7779-AD12-4634-9758-BB398648BBA6/XDQiMing.app/XDQiMing for reading.
[+] Reading header
[+] Detecting header type
[+] Executable is a plain MACH-O image
[+] Opening XDQiMing.decrypted for writing.
[+] Copying the not encrypted start of the file
[+] Dumping the decrypted data into the file
[+] Copying the not encrypted remainder of the file
[+] Setting the LC_ENCRYPTION_INFO->cryptid to 0 at offset c08
[+] Closing original file
[+] Closing dump file
最后的最后,就是将砸壳后的文件 Target.decrypted 拷贝回MacOS上。
动态分析
定位目标函数的方法
主要是利用cycript实现。
1.注入进程
iPhone:~ root# ps -e | grep /Applications
5288 ??         0:05.52 /var/containers/Bundle/Application/4E0F7779-AD12-4634-9758-BB398648BBA6/TargetApp.app/TargetApp
 5296 ttys001    0:00.00 grep /var/containers/Bundle/Application/
iPhone:~ root# cycript -p 5288
2.分析UI层次结构
先打开TargetApp到需要定位的功能页面
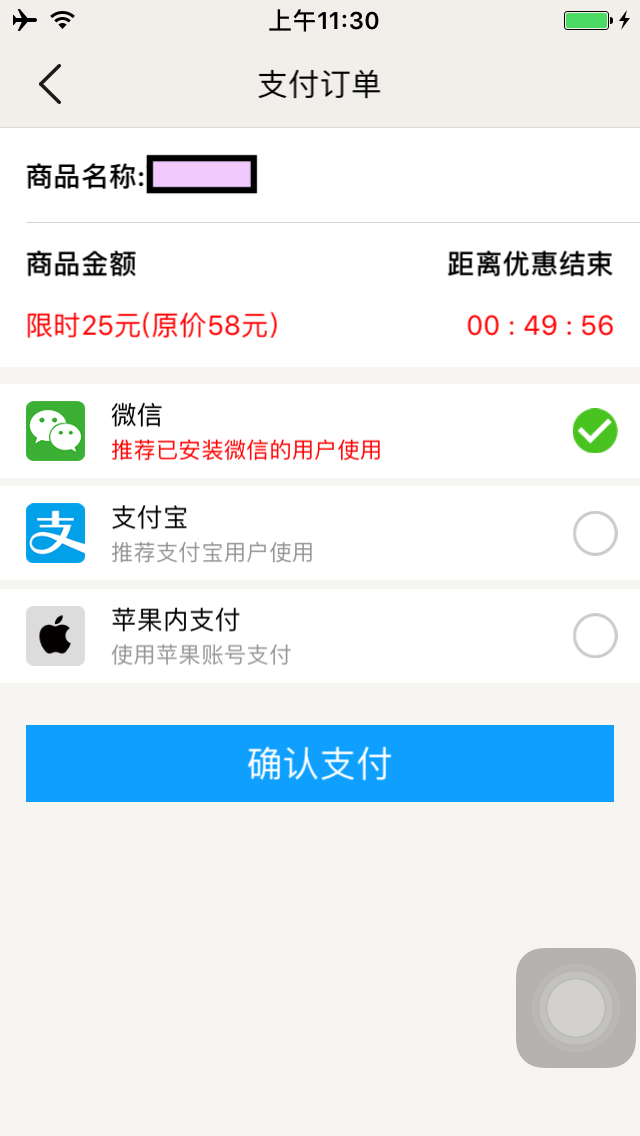
然后使用历遍打印排查的方式,将逐级界面上的控件列表输出分析
cy# [[UIApp keyWindow] recursiveDescription].toString()ps:加.toString()是为了格式化换行符等符号,使输出更易于阅读,以往让cycript开启翻译格式符号功能的?expand指令已经失效了。
得出的结果是这个样子的
其中,发现有一个LCTableView,其包含的XDPayCell里有显示微信和推荐已安装微信的用户使用这两个文案的Unicode,所以可以基本确定LCTableView就是选择支付方式的列表。
<LCTableView: 0x101a72600; baseClass = UITableView; frame = (0 192; 320 153.6); clipsToBounds = YES; gestureRecognizers = <NSArray: 0x17045b0f0>; layer = <CALayer: 0x17043a820>; contentOffset: {0, 0}; contentSize: {320, 153.60000228881836}>
    <UITableViewWrapperView: 0x1018fd400; frame = (0 0; 320 153.6); gestureRecognizers = <NSArray: 0x17045b420>; layer = <CALayer: 0x17043a860>; contentOffset: {0, 0}; contentSize: {320, 153.59999999999999}>
        <XDPayCell: 0x101a73000; baseClass = UITableViewCell; frame = (0 0; 320 51.2); autoresize = W; layer = <CALayer: 0x17043b760>>
            <UITableViewCellContentView: 0x10c22ced0; frame = (0 0; 320 51.2); gestureRecognizers = <NSArray: 0x17045ce00>; layer = <CALayer: 0x17043bce0>>
            <UIView: 0x10c22ccd0; frame = (0 0; 320 46.9333); layer = <CALayer: 0x17043bb20>>
                <UIImageView: 0x100779510; frame = (12.8 8.53333; 29.8667 29.8667); opaque = NO; userInteractionEnabled = NO; layer = <CALayer: 0x17043bbc0>>
                <UILabel: 0x10c22d1d0; frame = (55.4667 8.53333; 85.3333 12.8); text = '\u5fae\u4fe1'; userInteractionEnabled = NO; layer = <_UILabelLayer: 0x170481ae0>>
                    <_UILabelContentLayer: 0x17442e6e0> (layer)
                <UILabel: 0x10c22d460; frame = (55.4667 27.3067; 320 11.0933); text = '\u63a8\u8350\u5df2\u5b89\u88c5\u5fae\u4fe1\u7684\u7528\u6237\u4f7f\u7528'; userInteractionEnabled = NO; layer = <_UILabelLayer: 0x170480050>>
                    <_UILabelContentLayer: 0x17442e6c0> (layer)
                <UIImageView: 0x10c22d820; frame = (288 0; 19.2 46.9333); opaque = NO; userInteractionEnabled = NO; layer = <CALayer: 0x17043bb00>>

...

<UIButton: 0x10c22b490; frame = (12.8 362.667; 294.4 38.4); opaque = NO; layer = <CALayer: 0x17043acc0>>
    <UIButtonLabel: 0x10c22ca20; frame = (110.5 8.5; 73.5 21.5); text = '\u786e\u8ba4\u652f\u4ed8'; opaque = NO; userInteractionEnabled = NO; layer = <_UILabelLayer: 0x170480af0>>
<_UILabelContentLayer: 0x17043be80> (layer)然后与LCTableView同级的还有一个UIButton,也基本可以猜测到其就是确认支付按钮,下面来验证一下
cy# button=#0x10c22b490
cy# [button setHidden:YES]发现确认支付按钮隐藏了,证实 #0x10c22b490 就是我们要找的对象。
如果界面布局比较复杂,控件繁多又没有什么标识能识别的时候,可以换个角度,通过找其相关的更易定位的控件或容器来间接寻找,同样是使用setHidden这种方式,配合上subviews和superView方法。
如果怀疑是一个独立的window时,可以使用[UIApp windows]来获取。
3.定位函数
cy# [button allTargets]
[NSSet setWithArray:@[#"<XDPayViewController: 0x101194000>"]]]
cy# [button allControlEvents]
64
cy# [button actionsForTarget:#0x101194000 forControlEvent:64]
@["clickDetermineBtn"]
这样就能定位到函数的实现是在 XDPayViewController类 的 clickDetermineBtn方法里。
分析函数地址的方法
** 计算真实地址 **
真实的地址其实就是偏移后的基地址
偏移后的基地址 = 偏移前的基地址 + ASLR偏移
ASLR偏移可以在lldb下使用以下指令获得
(lldb) image list -o -f
[  0] 0x00000000000c8000 /var/containers/Bundle/Application/4E0F7779-AD12-4634-9758-BB398648BBA6/Target.app/TargetApp(0x00000001000c8000)
[  1] 0x00000001005d0000 /Users/nero/Library/Developer/Xcode/iOS DeviceSupport/10.3.3 (14G60)/Symbols/usr/lib/dyld
...
在[序号]左边紧挨的地址就是 ASLR偏移
偏移前的基地址则需要在IDA/Hopper里查看

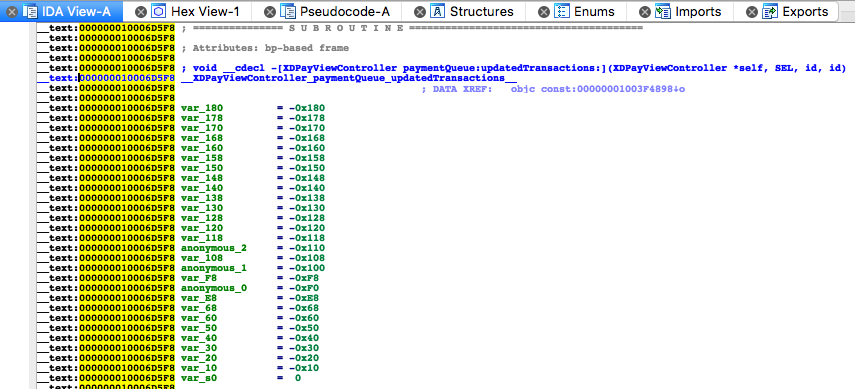
就拿上面XDPayViewController实现的paymentQueue:updatedTransactions:方法为例,其偏移后的地址就是 0xC8000 + 0x10006D5F8,即0x1001355F8。
需要注意ASLR偏移的选取,这里因为XDPayViewController属于TargetApp这个模块,所以选择TargetApp的ASLR偏移,即是ASLR偏移要根目标类所在的模块来决定。
真是需要动静结合才能获得真实的地址啊,而拿真实地址的主要目的是下断点
(lldb) b 0x100079ba4
Breakpoint 1: where = XDQiMing`_mh_execute_header + 154532, address = 0x0000000100079060
这里的where是不会直接显示相应的符号,这是因为OC方法没有符号,而lldb则用上了一个有符号的函数+offset来表示。
然后恢复进程继续运行,操作界面使断点所在函数触发,再结合使用lldb的调试指令就能获取或更改该函数运行时的变量数据
(lldb) c
Process PID resuming
Process 3255 stopped
* thread #1, queue = 'com.apple.main-thread', stop reason = breakpoint 2.1
    frame #0: 0x0000000100079ba4 XDQiMing`_mh_execute_header + 154532
XDQiMing`_mh_execute_header:
->  0x100079ba4 <+154532>: sub    sp, sp, #0xb0             ; =0xb0
    0x100079ba8 <+154536>: stp    d11, d10, [sp, #0x30]
    0x100079bac <+154540>: stp    d9, d8, [sp, #0x40]
    0x100079bb0 <+154544>: stp    x28, x27, [sp, #0x50]
Target 0: (XDQiMing) stopped.
(lldb) ni
(lldb) si
(lldb) p (char *)$r1
(lldb) register write $rn x
还有一种可以不用派上IDA就能知道真实地址的方法
(lldb) po [XDBigNameViewController _shortMethodDescription]
<XDBigNameViewController: 0x1004e33e0>:
in XDBigNameViewController:
	Properties:
		@property (retain, nonatomic) LCCollectionView* collectionView;  (@synthesize collectionView = _collectionView;)
		...
	Instance Methods:
		- (void) initData; (0x100079a00)
		...
in LCViewController:
	Properties:
		@property (retain, nonatomic) UIImageView* imageView;  (@synthesize imageView = _imageView;)
		...
	Instance Methods:
		- (void) pushViewControllerClass:(Class)arg1 Param:(id)arg2 Animated:(BOOL)arg3; (0x100141efc)
...更多的黑科技请参阅这个链接。
静态分析
头文件分析
利用class-dump这款工具就能够将破壳的二进制文件中的所有头文件导出,然后建立一个空的Xcode工程导入这些头文件来翻看,方便阅读和查找内容
class-dump -H /Users/mac/Desktop/Payload/Kt.app -o /Users/mac/Desktop/PayloadMach-O分析
Mach-O为Machine Object文件,是一种可执行文件、目标代码、动态库、内核转储的文件格式,利用IDA或者Hopper Disassembeler等交互式反汇编工具能实现对二进制代码的反汇编,他们能支持多种操作系统和多种CPU指令集反编译。
要注意反编译的可执行的二进制文件是fat binary还是thin binary,若是fat binary则应先减肥,指定保留一个架构(与IDA中选择反编译的架构需一致,但最新版本的IDA好像已经支持导入fat binary,可以免去对二进制文件减肥的步骤)
$ lipo -info /path/to/execution
Non-fat file: /path/to/execution is architecture: arm64
$ lipo -thin armv7 execution -output execution_armv7
IDA
收费版的IDA还有一个很好用的功能,就是传说中的F5(Pseudocode)
作用就是将下图汇编样式的语法转换为下下图中的c样式语法表示,阅读代码时更直观方便,不用再去ARM官网查指令、分析寄存器的交替(其实这是基本功,先了解其原理还是有好处)。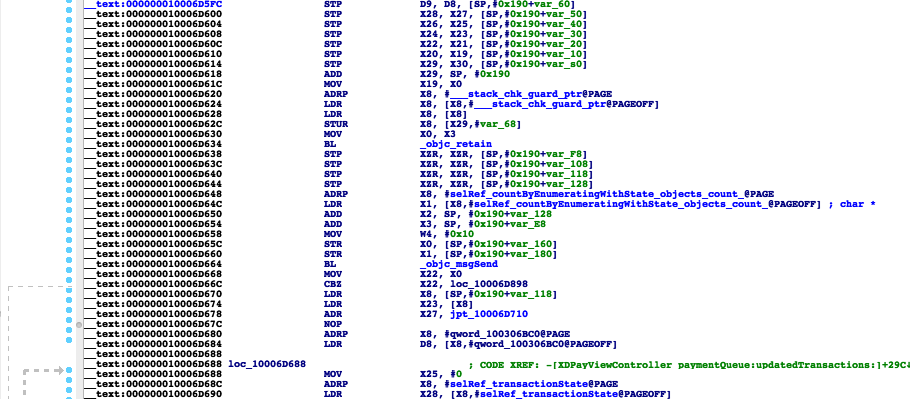
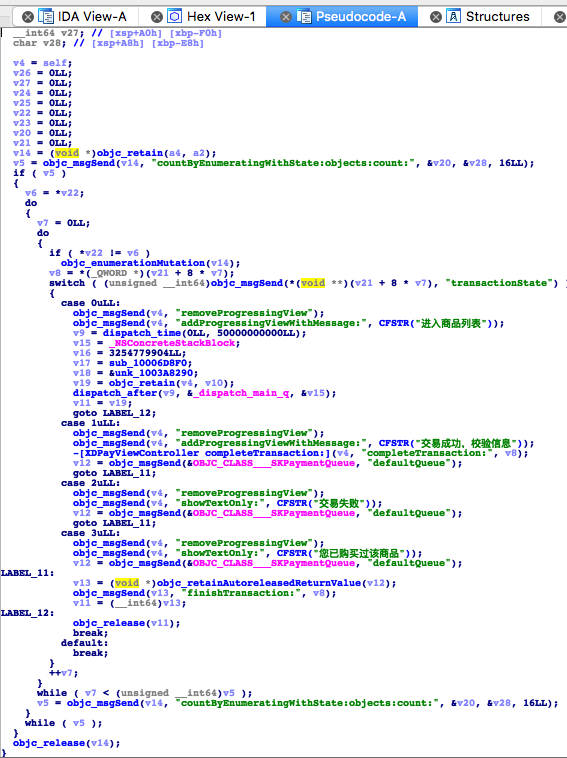
ARM汇编
在调用方法前,常用R0R3(x0x3)寄存器保存objc_msgSend中的各个参数,分别是调用者、selector、参数1、参数2,在调用方法后,返回结果会存到R0,若有超过两个的参数时,多出的参数会存在栈中,地址是*SP、 *(SP+sizeOfLastArg)、…。
更多的汇编指令和详细说明可以参考ARM官方文档。
Tweak开发
Tweak创建
配置环境变量
export THEOS=/opt/theos若不先配置环境变量的话,当make的时候会提示以下错误
Makefile:1: /makefiles/common.mk: No such file or directory
Makefile:6: /tweak.mk: No such file or directory
创建theos工程
/opt/theos/bin/nic.pl1.选择模板=>2.tweak项目名=>3.deb包名=>4.作者名=>5.tweak作用对象(bundleID表示)=>6.安装后需重启的应用(进程名表示)
Tweak编写
创建Tweak项目后,tweak.xm里的自带模板如下
/* How to Hook with Logos
Hooks are written with syntax similar to that of an Objective-C @implementation.
You don't need to #include <substrate.h>, it will be done automatically, as will
the generation of a class list and an automatic constructor.

%hook ClassName

// Hooking a class method
+ (id)sharedInstance {
	return %orig;
}

// Hooking an instance method with an argument.
- (void)messageName:(int)argument {
	%log; // Write a message about this call, including its class, name and arguments, to the system log.

	%orig; // Call through to the original function with its original arguments.
	%orig(nil); // Call through to the original function with a custom argument.

	// If you use %orig(), you MUST supply all arguments (except for self and _cmd, the automatically generated ones.)
}

// Hooking an instance method with no arguments.
- (id)noArguments {
	%log;
	id awesome = %orig;
	[awesome doSomethingElse];

	return awesome;
}

// Always make sure you clean up after yourself; Not doing so could have grave consequences!
%end
*/
涉及到函数语法包括:
- %hook:指定要hook的class,以%end结尾
- %log:将函数的类名、参数等写入syslog
- %orig:调用hook的原函数
- %group:将%hook分组
- %init:初始化某个%group
- %ctor:显式定义调用%init
- %new:添加新函数
- %c:作用等同于NSClassFromString
Tweak编译
编译
makeMaking all for tweak Nero_first_iosre…
make[2]: Nothing to be done for `internal-library-compile’.
若手动删除了obj文件后再make出现以上报错的话,将和obj同一个目录的.theos里面的东西删掉就能解决。
若发现make后的obj里没有.dylib文件,那是因为新版本的Theos已经将它放到了obj同目录下的.theo/obj/debug/
http://bbs.iosre.com/t/obj/3197
clang: warning: libstdc++ is deprecated; move to libc++ with a minimum deployment target of iOS 7
如果是出现以上warning的话,狗神说不用管。
warning: no debug symbols in executable
出现以上warning的话,可先尝试安装一下LZMA
make[3]: * No rule to make target ‘/path/to/project.dylib’. Stop.
make[2]: * [/path/to/project.dylib] Error 2
make[1]: * [internal-library-all_] Error 2
make: * [project.all.tweak.variables] Error 2
出现上面error的话,检查项目路径是否带有中文。
sudo cpan IO::Compress::Lzma不过我安装了仍然存在该警告,但不影响打包 - -。
打包
make packagedm.pl: building package
com.nero.firstproject:iphoneos-arm' in./packages/com.nero.firstproject_0.0.1-1+debug_iphoneos-arm.deb’
看到上面的输出,即代表已经生成了可发布及安装的deb包了,在项目根目录下的packages文件夹中。
另外,可以使用dpkg查看deb包的结构
cd packages
dpkg -c com.nero.firstproject_0.0.1-1+debug_iphoneos-arm.deb
drwxr-xr-x root/wheel 0 2018-07-20 12:40 .
drwxr-xr-x root/wheel 0 2018-07-20 12:40 ./Library
drwxr-xr-x root/wheel 0 2018-07-20 12:40 ./Library/MobileSubstrate
drwxr-xr-x root/wheel 0 2018-07-20 12:40 ./Library/MobileSubstrate/DynamicLibraries
-rwxr-xr-x root/wheel 98704 2018-07-20 12:40 ./Library/MobileSubstrate/DynamicLibraries/firstproject.dylib
-rw-r–r– root/wheel 57 2018-07-20 12:40 ./Library/MobileSubstrate/DynamicLibraries/firstproject.plist
若要重新编译,可使用下面指令,并清除.theos文件夹里的所有内容
make clean然后是把deb安装到手机上。当然也可以手动用scp或者iFunbox拷贝deb到手机上再通过iFile安装。
make installTHEOS_DEVICE_IP = 192.168.1.231
ARCHS = arm64 armv7s
TARGET = iphone:latest:8.0
有网友提到使用make install要注意的坑是将上面三行内容写在Makefile(相当于app项目中的info.plist文件)的最开头位置,原理也是通过scp完成。
安装deb后可以在Cydia的已安装->专业人士一栏里找到该deb,点击进去能查看详细的信息
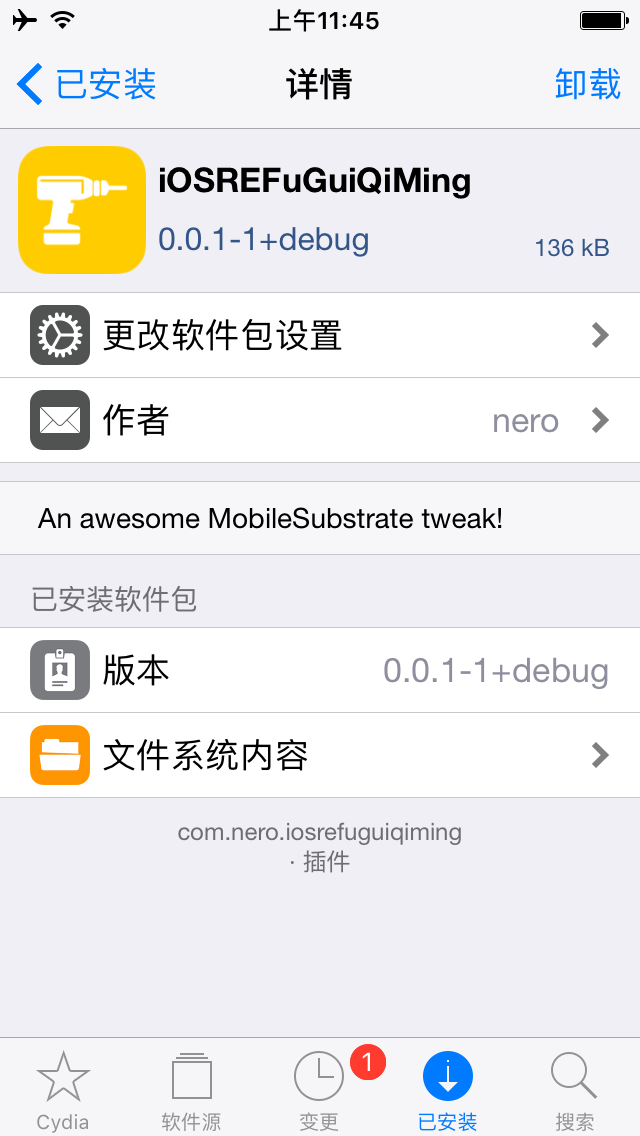
转载请注明来源,欢迎对文章中的引用来源进行考证,欢迎指出任何有错误或不够清晰的表达。可以在下面评论区评论,也可以邮件至 mingfungliu@gmail.com
文章标题:iOS逆向(三)分析篇
文章字数:3.9k
本文作者:Mingfung
发布时间:2018-09-13, 22:39:03
最后更新:2018-09-13, 23:22:49
原始链接:http://blog.ifungfay.com/iOS/iOS逆向(三)分析篇/版权声明: "署名-非商用-相同方式共享 4.0" 转载请保留原文链接及作者。

